
In this article
- What is a bug-out bag actually for?
- Calculating your personal target pack weight
- Choosing and fitting a backpack: a foundational decision
- Water strategy: lightening the load without compromising safety
- Food: Finding the balance between energy and weight
- Shelter: lightweight alternatives to the traditional tent
- Sleep system: lightweight options based on the season
- Clothing: Quality Over Quantity
- Distributing weight intelligently within your pack
- Advanced weight-reduction techniques
- Summary and points to consider
- Frequently Asked Questions
- Related resources
A bug-out bag that is too heavy quickly becomes a hindrance rather than an asset. Understanding how to calculate the optimal weight for a bug-out bag—and how to achieve it without sacrificing the essentials—is one of the most practical aspects of civilian emergency preparedness.
A bug-out bag is intended for use when moving to a safe location. The duration for which it is used depends on the distance, the mode of transport, the weather, and the availability of shelter. Three days serves as a benchmark for preparing supplies; it is neither a set timeframe for how long one should remain on the move, nor a guarantee of total self-sufficiency.
What is a bug-out bag actually for?
Start by defining your destination and any alternatives. The bag must remain suitable for the actual journey you anticipate and the needs of your household. A trip to an accessible place of shelter requires different equipment than an excursion into a remote area; tailor the contents to the specific situation rather than seeking a "one-size-fits-all" model.
While this duration may vary based on each household’s specific evacuation plan, it provides the framework for deciding what to pack. Going beyond this scope only adds weight to the bag without necessarily improving your actual ability to evacuate.
Field observation: When traveling long distances on foot, an overly heavy pack does more than just slow your progress—it impairs decision-making, increases the risk of injury, and depletes energy reserves that will be needed upon arrival. Accounts from experienced hikers and individuals who have undergone actual evacuations all point to this conclusion.
Skills and equipment: an inverse relationship
Skills enable you to better select and use your gear. However, they are no substitute for safe water, medical treatments, or protection against the cold. Evaluate every item you remove through a realistic test: reducing weight is only beneficial if the necessary function is still covered. Learning a new technique does not automatically guarantee a specific amount of weight saved.
The goal is not to carry a supply of everything, but rather to learn how to function with a carefully selected, minimal set of equipment, supplemented by resources available along your route.
Calculating your personal target pack weight
While body weight can be a useful reference for comparing loads, it is not enough on its own to determine a safe weight. Factors such as health, mobility, physical conditioning, the duration of the trip, and the terrain also play a role. Start with a weighed pack, test it gradually, and reduce the load if it causes pain, loss of balance, or excessive fatigue.
The percentages provided below are intended solely to illustrate how to calculate a relative load. These do not constitute a medical recommendation, a mandatory target, or a safe limit applicable to everyone:
Goal
10% of body weight
An ideal weight, achievable for the vast majority of people. Suitable for those without specific physical conditioning, as well as those planning to cover long distances or navigate challenging terrain. Example: 70 kg (154 lb) → 7 kg (15.4 lb) pack
Maximum
20% of body weight
An upper limit, realistic only for individuals who train regularly. Beyond this, fatigue accumulates rapidly, and the risk of musculoskeletal injury increases. Example: 70 kg (154 lb) → 14 kg (30.8 lb) pack
Concrete example: for a person weighing 75 kg (165 lb), the ideal pack weight is around 7.5 kg (16.5 lb), with an absolute maximum of 15 kg (33 lb). These figures include the weight of any water being carried.
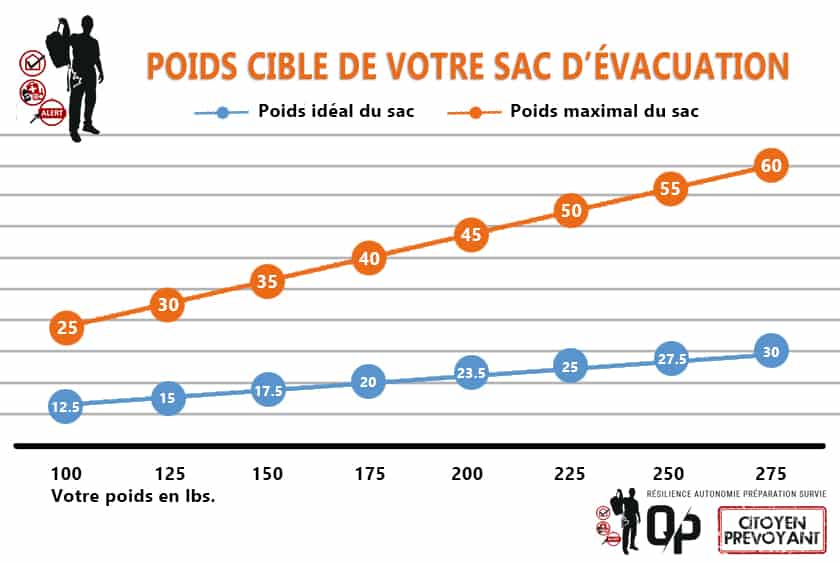
Table of recommended weights based on body weight
Important variable: These ranges vary depending on age, physical condition, expected weather conditions, and the nature of the terrain. A route over flat ground in mild weather is not the same as a winter traverse in the mountains.
Choosing and fitting a backpack: a foundational decision
"A good, well-fitted backpack allows you to carry the same amount of weight with significantly less effort than an ordinary, poorly positioned pack."
Consider the pack’s volume and its suspension system together. The back length, shoulder strap adjustments, hip belt, and access to pockets must all suit your body type. A properly fitted hip belt can help distribute the load, though the exact percentage of weight transferred varies depending on the pack and how it is adjusted. Always test the pack while it is loaded before relying on it.
How to measure your back
The key measurement is your torso length: the distance from the seventh cervical vertebra (the bony bump at the base of your neck) to the top of your iliac crests (your hip bones). Use a flexible measuring tape to determine this distance, which will help you select the right pack size.
Checklist for fitting:
- The hip belt rests on your hips, not above them.
- The shoulder straps sit flush against your shoulders, with no gaps.
- The pack remains stable when you shift your hips from side to side.
- There is no painful pressure after 15 to 20 minutes of walking with a loaded pack.
If you purchase a backpack online, it is essential to test it while loaded as soon as it arrives. Minor discomfort when the pack is empty can become debilitating after several hours of hiking.
Water strategy: lightening the load without compromising safety
One liter of water (0.26 gal) weighs 1 kg (2.2 lb). Carrying 3 liters (0.8 gal) therefore adds 3 kg (6.6 lb)—a significant amount of weight that can be reduced through proper planning.
Two complementary approaches
Water caches along the route
Positioning water supplies at specific points along an evacuation route means you only need to carry 1 to 1.5 liters (0.26 to 0.4 gal) between each point. The location of each cache must be precisely marked on your route map.
Purification en route
Identifying natural water sources along your path and mastering several purification methods allows you to reduce the amount of water you need to carry. Potential savings: 2 to 3 kg (4.4 to 6.6 lb), depending on the route.
Important note: A minimalist approach to water is only viable if resupply sources have been identified and verified in advance. Reducing weight without proper preparation can become a genuine risk in an emergency situation.
Food: Finding the balance between energy and weight
Planning your meals helps maintain your energy levels and comfort, and ensures you can continue any necessary medical treatments. Needs vary depending on the individual and the activity; there is no point in estimating requirements based on a theoretical survival timeframe without food. Choose foods that are well-tolerated and easy to consume given the resources you have available, and be sure to account for any allergies as well as the water required for preparation.
A pragmatic approach for a 72-hour evacuation includes:
- One freeze-dried meal per household member
- High-calorie energy bars
- The equivalent of one full day’s worth of food
While this amount is not comfortable for the long term, it is sufficient to maintain energy levels and mental clarity while on the move.
Field tip: Consume the heaviest food items first. Your legs are freshest at the start, and your pack is at its heaviest—it makes sense to reduce that load quickly while gaining maximum caloric intake during the period of greatest physical exertion.
Sourcing food while on the move
Improvised fishing
If your route follows a body of water, a fishing line and hook (weighing only a few grams) can provide protein without requiring extra gear to carry. Cooking the catch directly over a fire eliminates the need for a portable stove.
Edible plants
Learning to identify local edible plants is a skill that should be developed well before the need arises. This knowledge varies significantly depending on the region and the season.
Sourcing food: pre-planned solutions
Do not rely on hunting or trapping to sustain you during an evacuation. The outcome is uncertain, such activities are often regulated, and they may force your group to remain in one place, away from your planned route. Prepare meals to take with you, organize your resupply strategy, and identify accessible support locations. Hunting or trapping requires specific training and separate permits.
Shelter: lightweight alternatives to the traditional tent
The weight of a tent depends on the model, its capacity, and its accessories. A tarp or other type of shelter may be suitable for certain trips, but it does not necessarily provide the same level of protection against insects, wind, rain, or cold. Evaluate the entire system—including attachment methods, ground protection, and sleeping gear—before opting for a lighter alternative.
The versatile tarp
A lightweight tarp with multiple grommets, paired with some paracord, can be used to construct a shelter suitable for most weather conditions. It can also serve as a ground sheet, a gear wrap, or an emergency cover.
Some links below are affiliate links: we may receive a commission at no additional cost to you. Products are examples by function, to choose according to your needs; buying the entire selection is unnecessary.
Natural shelters: making use of the surrounding environment
- Conifers with low-hanging branches: the sheltered space beneath a dense spruce or fir tree provides natural protection from wind and rain. The layer of needles on the ground acts as natural insulation.
- Rock overhangs: used for millennia, these offer effective shelter—provided you first check for the presence of animals and ensure the stability of the surrounding terrain.
- Lean-to shelter: a combination of paracord, a tarp, and natural elements—one of the most versatile configurations for a night spent outdoors.
What a tent cannot provide: In the face of a tornado, forest fire, or severe storm, a lightweight tent offers no significantly better protection than a rock overhang or a sheltered trench. Knowledge of the terrain and the ability to identify naturally protected areas are essential skills that gear alone cannot replace.
Practical recommendation: Practice building shelters using a tarp in your garden or during outdoor excursions before having to rely on this skill in an emergency. Your first attempt should not be during an actual evacuation.
Forgoing a traditional tent can save 2 to 3 kg (4.4 to 6.6 lbs)—one of the most significant weight reductions possible for an evacuation pack (bug-out bag).
Sleep system: lightweight options based on the season
Mild temperatures
In warm weather, a tarp alone—potentially combined with a lightweight liner—is sufficient for most summer nights in lowlands or at low altitudes.
Cold temperatures or high altitude: the bivy sack
A reflective bivy sack can help limit certain types of heat loss and provide wind protection, depending on the specific context. It does not automatically replace the insulation provided by a sleeping bag and a sleeping mat. In cold conditions, consider the entire sleep system, the risk of condensation, the forecasted temperature, and the possibility of reaching safe, permanent shelter.
Typical Specifications
Reflective Bivouac Bag
- Unfolded: approximately 210 cm × 90 cm
- Folded: fits in the palm of your hand
- Weight: 150 to 200 grams (5.3 to 7 oz), depending on the model
Optimization
Thermal Layering
Dry, appropriate clothing complements your sleeping gear; however, adding such layers does not allow for a reliable minimum temperature rating for a reflective bivouac bag. Always verify the limits of each individual item and test your entire system in a controlled environment with a backup plan in place. An unexpected wait in cold conditions may necessitate calling for help much sooner than originally anticipated.
Clothing: Quality Over Quantity
Your choice of clothing depends directly on the climate of your intended evacuation area and the current season. Reviewing the contents of your pack seasonally—at least twice a year—ensures your gear remains appropriate without adding unnecessary weight.
Investment Logic: A few high-quality pieces—durable, lightweight, and versatile—are often a better choice than a large volume of standard clothing. Technical materials (such as merino wool or breathable synthetics) offer a superior protection-to-weight ratio compared to conventional textiles.
The "skivvy roll": a proven, compact technique
This military method for packing clothing allows you to bundle a complete change of attire (T-shirt, underwear, and socks) into a compact roll, held together by the socks themselves.
Standard contents:
- One spare T-shirt
- One pair of folded underwear
- One pair of socks
Rolling method:
- Lay the T-shirt flat and place the folded underwear in the center, just below the neckline.
- Fold the right and left sides of the T-shirt toward the center.
- Place the socks—toe-to-heel—across the folded-in sleeves.
- Roll the bundle tightly, starting from the collar and moving downward.
- Fold the ends of the socks over the roll to secure it.
For a household of four, a full set of these spare-clothing rolls weighs less than half a kilogram (1 lb).
Distributing weight intelligently within your pack
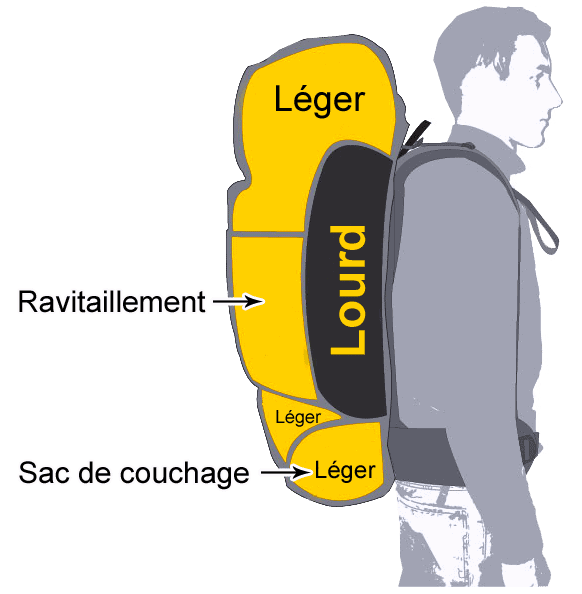
The principle is simple: the further an object is from the body’s central axis, the greater the leverage it creates, placing extra strain on the back muscles. Therefore, heavy items should be packed as close to the spine as possible.
Upper central zone
Heavy items
In the middle of the pack, against the back, at shoulder height. This is where water, dense food, and heavy tools should go. This positioning aligns the center of gravity with the hips.
Lower zone
Soft, lightweight items
Store dry clothing, your tarp, and sleeping gear in moisture-proof protection. These items can be essential for thermal protection; placing them at the bottom of your pack is a strategic organizational decision, not merely a matter of comfort.
Quick access
Items within immediate reach
Headlamp, map, snacks, first-aid kit: keep these at the top of your pack or in external pockets so they can be accessed without having to unpack.
A common mistake: Hanging heavy items on the outside of your pack (water containers, gear strapped to the exterior) shifts the weight away from your center of gravity, significantly increasing the muscular effort required over time.
Distributing some of the weight onto your person—in jacket or trouser pockets—reduces the strain on your back without changing the total load you are carrying.
Advanced weight-reduction techniques
Once the major decisions have been made (water, shelter, sleeping gear), you can refine your load further by addressing smaller, non-essential extras. While no single item is critical on its own, the cumulative weight of these extras can easily add up to several hundred grams.
- Remove only those accessories that are truly unnecessary; be careful not to cut away any components—such as adjustment straps or compression cords—that are essential for carrying the pack comfortably.
- Trim your map down to the specific area covered by your route (remove any irrelevant sections).
- Replace standard cutlery with a single titanium utensil.
- Shorten your toothbrush handle to the minimum functional length.
- Replace toothpaste in a tube with powdered toothpaste.
- Transfer all liquids (sunscreen, soap, etc.) into containers no larger than 30 ml.
- Use zip-top bags instead of rigid pouches to organize small items.
- Opt for titanium over stainless steel for cutlery and cookware.
Fire-starting: an exception to the "lightweight" philosophy.
Do not skimp on fire-starting gear: The ability to start a fire quickly—even in wet conditions, in the middle of the night, or with numb fingers—is one of the most critical skills in an emergency. Carrying three distinct, redundant methods is a reasonable minimum standard:
- Waterproof matches
- A high-quality lighter
- A ferrocerium rod (ferro rod)
Together, these three items weigh less than 100 grams and provide critical redundancy. While knowing how to start a fire via friction is a useful skill to possess, it should never be your only option.
Psychological factor: practice before an emergency
A lighter pack creates a greater reliance on practical skills. This equation only works if those skills have been practiced regularly and under a variety of conditions—not just read about or theorized.
A question to ask yourself honestly: If your pack contains no tent, no stove, and very little water, are you capable of getting through the night—for yourself and your family—given the likely weather conditions in your evacuation area? The answer should guide your final trade-offs.
Summary and points to consider
Managing the weight of a "Bug Out Bag" is not about pursuing minimalism for its own sake; it is a practical necessity for maintaining mobility and effectiveness during an actual evacuation. The key strategies identified in this article can be summarized as follows:
Weight-reduction strategies
Priority reductions
- Carried water → purification + water caches
- Tent → tarp + natural shelters
- Sleep system: evaluate the entire setup based on the conditions—do not simply replace a sleeping bag with a reflective emergency bivvy sack.
- Layering clothing → the "skivvy" (base layer) technique
Prerequisites
Skills to develop
- Proficiency in water purification
- Experience in shelter construction
- Ability to start a fire under various conditions
- Knowledge of the terrain and route
Scope of this article: The ranges and recommendations presented here serve as general guidelines. Each route, physical profile, family composition, and geographical context will require specific adjustments. This content is not intended to replace personalized planning.
One question remains open, depending on the context and the individual: at what point does lightening your load stop being beneficial and start becoming a risk? The answer depends as much on your available skills as it does on the likely conditions—and it is worth re-evaluating regularly as both of these factors evolve.
👉 To delve deeper into the entire logic behind gear and preparation, check out our reference page: Equipment & Logistics — A Complete Guide.
Frequently Asked Questions
What is the ideal weight for a "Bug Out Bag"?
There is no universal "ideal" weight. To give you an idea of the scale: 10% of 75 kg is 7.5 kg, while 20% is 15 kg—including the weight of the water and the pack itself. However, these calculations do not necessarily mean that any of these weights are appropriate for your specific situation. The practical benchmark is your ability to move without pain or loss of balance, while carrying essential supplies and following a realistic route.
How much water should you carry in an evacuation bag?
A "lightweight" approach involves carrying 1 to 1.5 liters (0.26 to 0.4 gallons) of water and planning for resupply points along your route—either via pre-positioned caches or by sourcing water from natural environments that you can then purify. This approach requires that you have already mastered a reliable purification method.
Is it possible to go without a tent in an evacuation bag?
Yes, provided you have developed the necessary skills. A lightweight tarp combined with some paracord allows you to construct an effective shelter in 15 to 20 minutes. Natural shelters (dense conifers, rock overhangs) serve as a useful alternative. This can save 2 to 3 kg (4.4 to 6.6 lbs) of weight. It is essential to practice this approach before relying on it in a real-world situation.
How should weight be distributed in an evacuation backpack (bug-out bag)?
The heaviest items should be placed in the center of the pack, against your back, at the level of your shoulder blades. Soft, lightweight items (clothing, bivouac gear) go at the bottom. Frequently accessed items (flashlight, map, snacks) should be placed at the top or in exterior pockets. This distribution aligns your center of gravity with your hips, reducing muscle fatigue.
How often should you review the contents of your pack?
A review twice a year is generally recommended—during the seasonal transitions (spring/summer and autumn/winter). This allows you to adjust your clothing, check expiration dates, test your equipment, and update the contents based on changes in your skill level or family situation.
What is the difference between a "bug-out bag" and an "INCH" bag?
An evacuation (bug-out) bag is designed to help you reach a safe location with supplies suited for travel. The acronym "INCH" (I’m Never Coming Home) refers to a scenario where a return is not possible; however, simply increasing the size of your pack does not provide long-term self-sufficiency. Housing, ongoing support, financial resources, medical treatments, and transportation solutions must still be arranged separately.
What is a "skivvy roll"?
It is a compact packing technique that originated in the military. It involves rolling a T-shirt, a pair of undergarments, and a pair of socks into a tight bundle, held together by the socks themselves. For a household of four, the total weight of these spare bundles is less than half a kilogram (1 lb), and they take up very little space.